Zoom Status If you're experiencing any issues with Zoom, check the Zoom status page to learn about any current widespread issues with the platform.
Zoom is an online communication and collaboration tool that provides video, web, and audio conferencing, and can be used to host meetings and hold online classes and discussion sessions. Meetings can range in size from just two participants up to 300. Explore the information below to familiarize yourself with Zoom basics, explore hot topics, and learn about advanced features that will make the tool more useful for remote teaching, learning, and working.
Zoom In UC Merced Spaces
Keep in mind when returning to campus, not all classrooms are designed the same way. Depending on the room Zoom may have limited capabilities. To learn which rooms support video conferencing refer to the image below.
Basic Video Conferencing - These spaces are limited to making calls using an IP address from one device to another.
Limited Zoom Compatibility - These spaces can join Zoom meetings as if they were a Participant: able to share content and hear & see other participants but otherwise unable to interact with or manage the meeting.
Full Zoom Compatibility - These spaces can host or join Zoom meetings, allowing for control and management of that meeting (participants, security, sharing, etc...) from the touch panel in the room.

1. Introducing Zoom Workplace
Changes starting 4/29/24 will improve UC Merced's access.
If you want to update your Zoom Client to Zoom Workplace, follow these instructions from Zoom
Visual Refresh
The appearance of the Zoom desktop app has been overhauled with a new color scheme and icons. These color schemes, including bloom (blue), agave (green), rose (red) and classic (black) will be available when running your client in light mode and can be selected through the app settings.
The In-Meeting Toolbar
The in-meeting experience will be updated with a more simplified toolbar and will allow end users to customize the toolbar by dragging-and-dropping icons to add, move, or remove meeting features specific to their needs. The in-meeting security tab will now be located under the ‘Host Tools’ icon.
Multi-Speaker View
The new multi-speaker view will enhance the meeting participant experience by dynamically adapting the meeting’s video layout to match current and recent speakers, highlighting and enlarging their video tiles over others, while still providing the view of other participants is a smaller gallery view.
Multi-Share We are making it easier to share content simultaneously while in a meeting. Participants can share their own screen or app window and Zoom Whiteboards at the same time, participants see each shared content as individual tabs within the meeting window.
Meeting Wallpapers
We will be introducing Meeting Wallpapers, which allow meeting hosts and co-hosts to customize their meeting view by adding more color and customization options. With this feature, the meeting’s host or co-host can choose a wallpaper background provided by their account admins, or from a preset selection provided by Zoom. Once a selection is made, the users can also adjust the blending levels between participant videos and the wallpaper image.
The Meetings Tab
Lastly, with Zoom Client version 6.0.0 the Meetings and Calendar tabs will be consolidated into a singular space to create greater visibility of your calendar, along with the associated details of your daily tasks. With this new view, users will be able to view and filter their upcoming meetings while also seeing attendee RSVP responses, and any shared materials ahead of the session. From this view, users can also check previous meeting assets such as recordings, continuous meeting chats, and whiteboards.
If you want to update your Zoom Client to Zoom Workplace, follow these instructions from Zoom
2. Zoom Bombing
'Zoom bombing' is a new form of trolling in which a participant uses Zoom's screen sharing feature to interrupt and disrupt meetings and classes.
-
12 Tips to Stay Secure on Zoom | Medium
-
UC CIOs statement on Zoom | UC SIS
If you have experienced an incident of Zoom Bombing, please report it via our Report a Cybersecurity Incident form so that our security team can review it.
3. New Zoom Requirement: Waiting Rooms and Passcodes
Changes starting 9/27/20 will help UC Merced further protect Zoom meetings.
Zoom will now require that all meetings have a passcode or a waiting room enabled for all accounts. For those that are already using either a passcode or a waiting room, there will be no changes. Zoom will automatically enable waiting rooms for all meetings starting Sunday, September 27, for those that don't have passwords or waiting rooms already enabled. Visit the OIT Zoom page for more information on how to manage waiting rooms and passcodes.
4. Zoom AI Companion
Zoom AI Companion has now arrived for the campus. Zoom AI Companion is a no-cost tool in Zoom that leverages generative AI to add the following features to Zoom:
- Meeting Summaries: Zoom AI Companion will generate a meeting summary based on what was discussed in the meeting. These summaries are emailed to the host at the end of the meeting. A host can also send these summaries to co-hosts, alternative hosts, and/or meeting attendees.
- In-Meeting Questions & Answers: An AI Companion question box can be enabled in a Zoom meeting to allow participants to ask questions and get automated answers based on what was discussed in the meeting. The host can choose if and when participants can use this feature.
- Smart Recordings: When recording a meeting to the cloud, Zoom AI companion can create recording highlights, chapter markers, and next steps based on the meeting discussion. A meeting coach is also available that provide metrics to help the host understand their talk/listen ratio, talk speed, use of filler words, and their shortest and longest spiel.
SECURITY & DATE PRIVACY NOTE: Zoom AI Companion features are only for use with P1 and P2 data as classified by UCOP. Do not use the features when discussing P3 or P4 data. Typically, P3 and P4 data us data that is sensitive, restricted, or privileged. Full information on what data falls into which protection levels is available on UCOP’s Security website, located here: Classification of Information and IT Resources. Please see the following website on AI Use at UC Merced for additional considerations when using AI tools for teaching, learning, research, and work.
Find how to get started with Zoom AI Companion and additional information from Zoom: Getting Started with Zoom AI Companion

Zoom Cheat Sheet
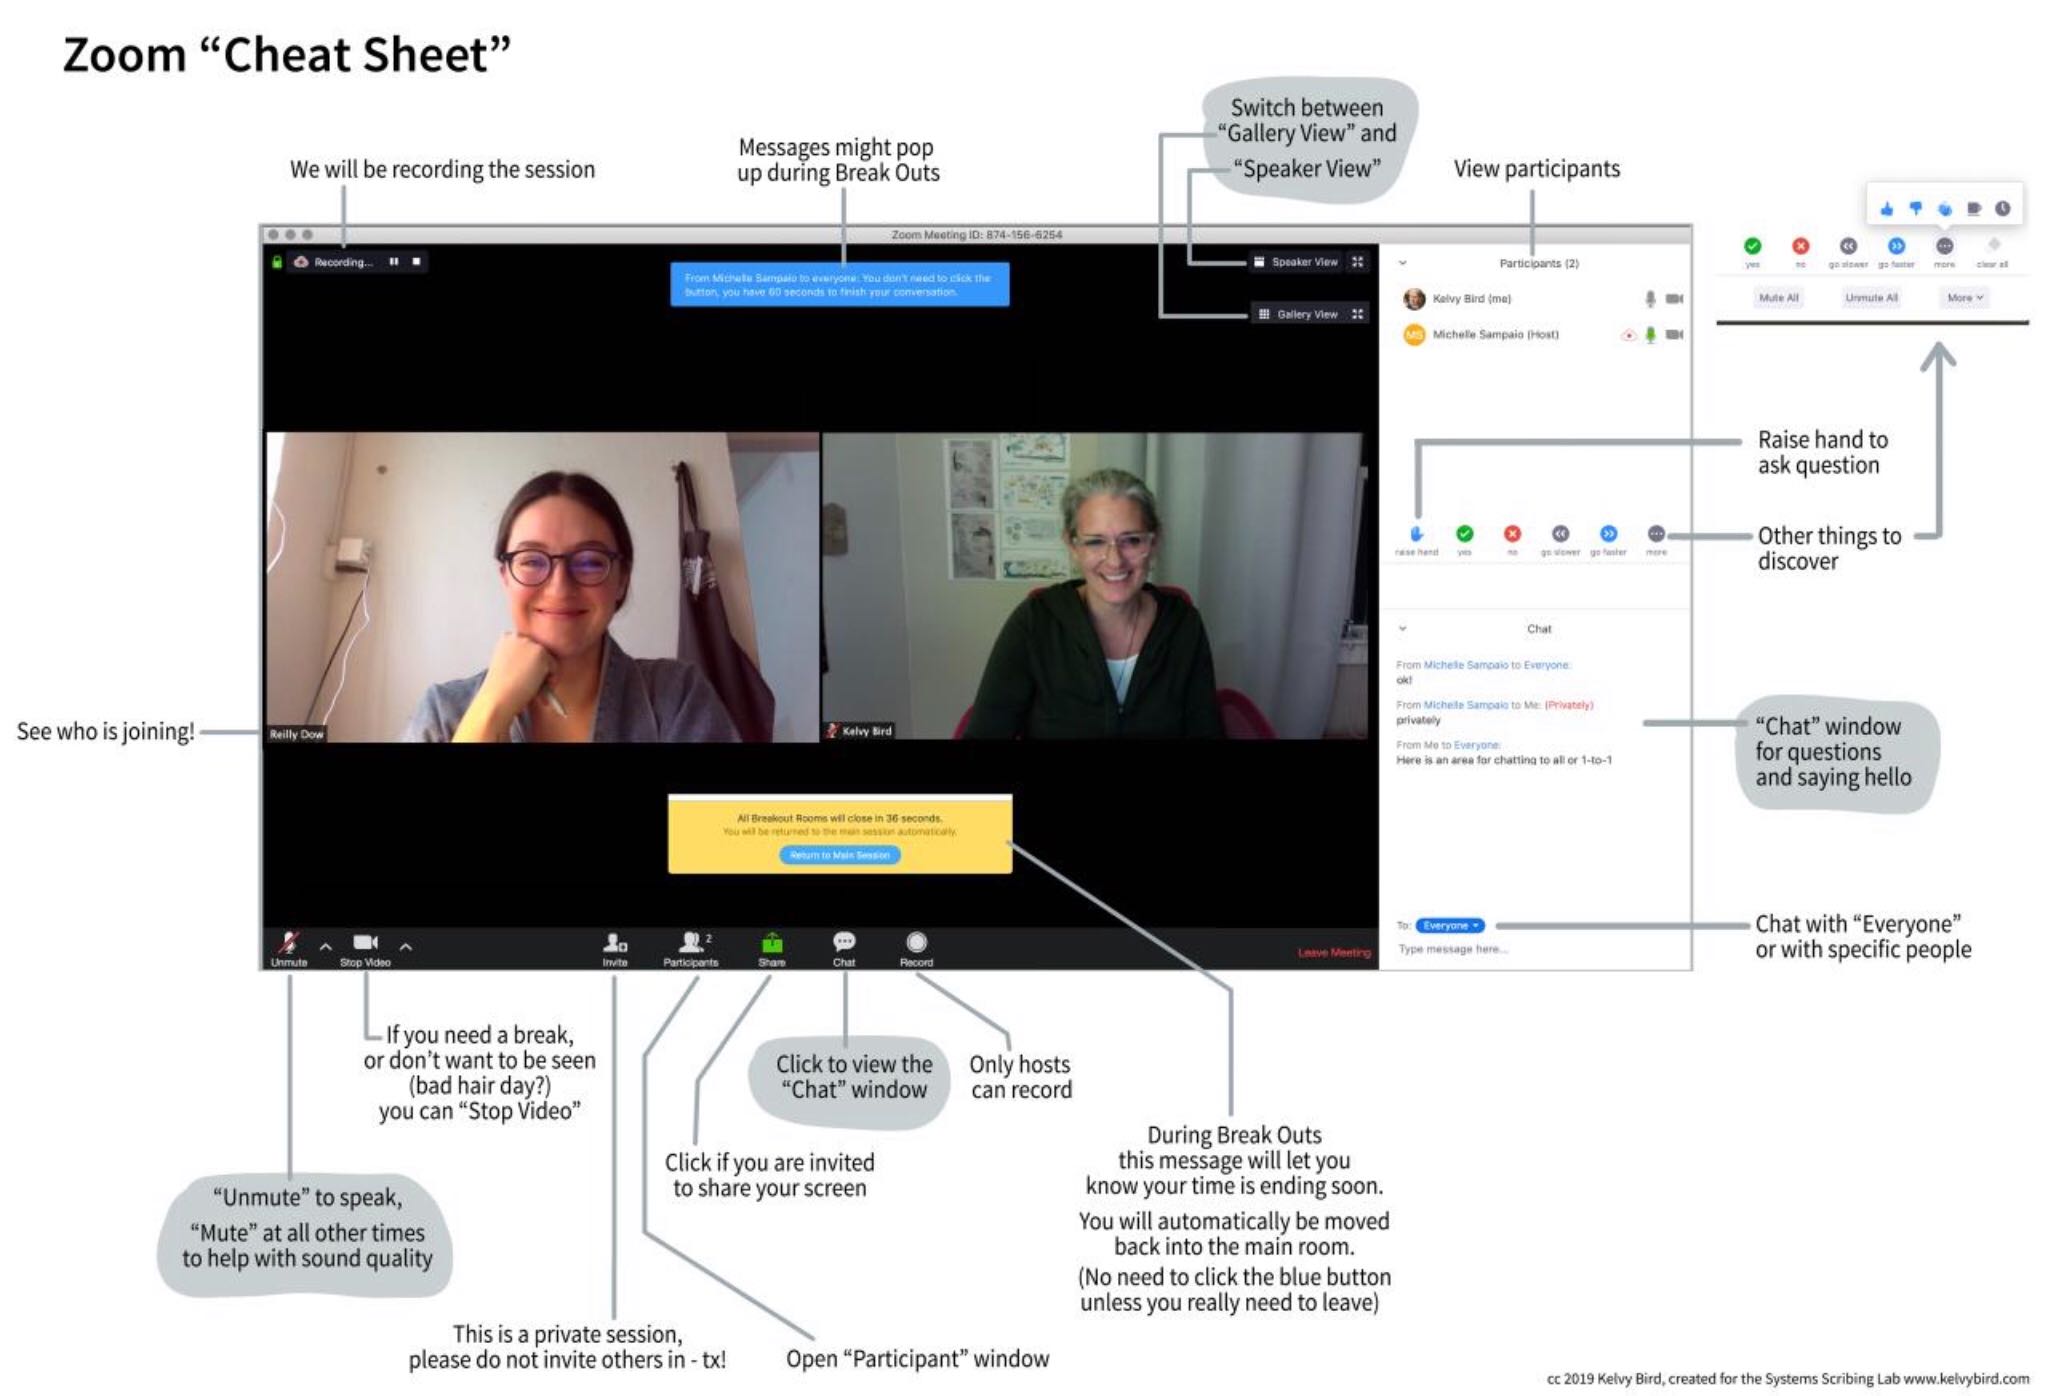
This quick Zoom cheat sheet will help you get oriented to Zoom features quickly.
Click on the image for a larger view or click Quick Zoom Cheat Sheet.
Default Zoom Security Settings at UC Merced
OIT has enacted some changes to the default settings for all UC Merced Zoom accounts to increase resiliency to Zoom bombing. The locations listed below will be used for all UC Merced-hosted Zoom meetings by default. These settings can be turned off at an individual account level or per meeting.
| Default Settings |
|---|
|
| Changing Default Settings for an Account |
|---|
|
Anyone can change the default settings for their Zoom account. Changing these settings will set the new settings for which all meetings will default to. Settings for individual meetings can be changed on a meeting-by-meeting basis if desired. Go to: https://ucmerced.zoom.us/profile/setting and log in with your UC Merced account if not already logged in.
1. Setting is on 2. Setting is off 3. Setting has been changed from the default. Click “Reset” to return the setting to its default state. |
| Changing Settings During a Meeting |
|---|
|
During a meeting, there are some settings you can change as needed, all located under the Security button on the bottom bar of your Zoom meeting, as follows:
|
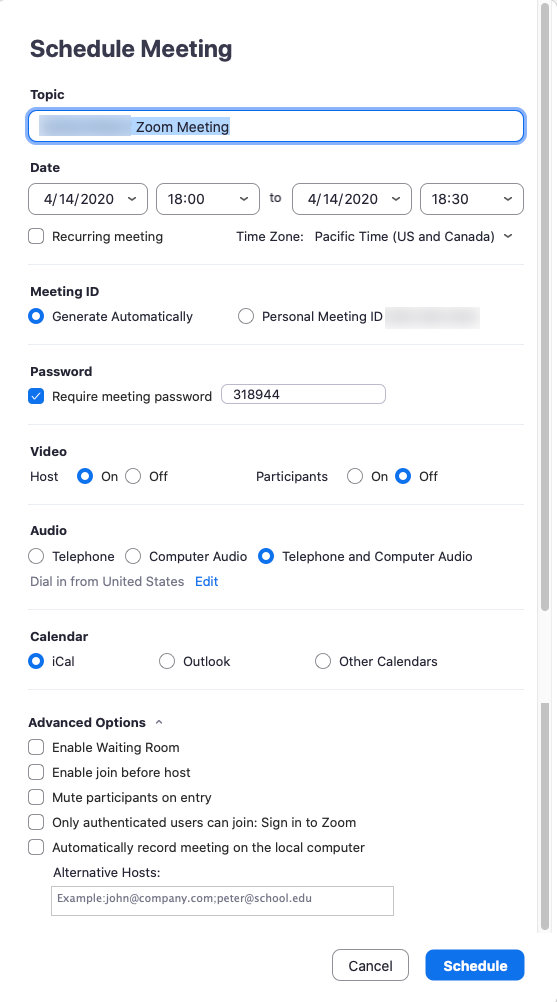
| Changing Settings when Scheduling a Meeting |
|---|
|
Many settings can be changed for a particular meeting if desired. When scheduling the meeting, options show up as seen in the above screenshot. Some options are in the “Advanced Options” dropdown. |
Breakout Rooms
Breakout Rooms are a feature that allows the Zoom host to divide participants into separate Zoom rooms for participants to do group work. The host can move into each breakout room to observe or collaborate with particular groups and eventually bring the groups back together in the main Zoom meeting.
Click to learn more about Getting Started with Breakout Rooms.
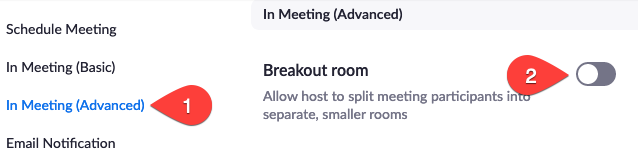
| Turn On Breakout Rooms |
|---|
|
1. Go to your Zoom Profile Settings and click on “In Meeting (Advanced).” 2. Click on the toggle next to "Breakout room." |
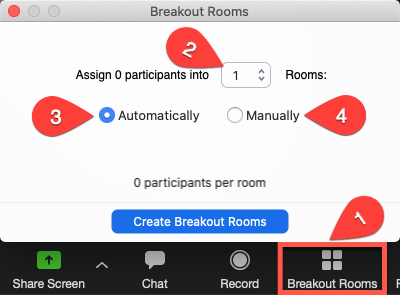
| Configure Breakout Rooms |
|---|
|
1. The next time you open Zoom, you should see a “Breakout Rooms” button 2. Chose how many breakout rooms you’d like Dividing participants into rooms: 3. Choose "Automatically" to have Zoom automatically divide those on the call into groups - OR - 4. Choose "Manually" to have Zoom manually assign participants to breakout rooms |
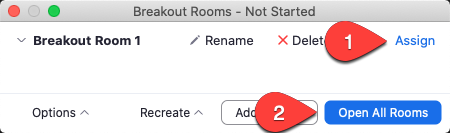
| Working With Automatically Created Breakout Groups |
|---|
|
If you’ve chosen to automatically create groups, the groups and the participants will be listed. 1. Click "Assign" next to each breakout room to choose who you’d like in the room 2. When you’re ready for everyone to move into the rooms they’ve been assigned to, |
| Joining Breakout Rooms |
|---|
|
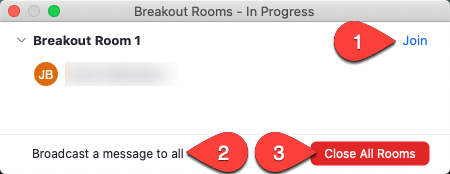
Once the breakout rooms are opened, You can: 1. Join individual rooms, -OR- 2. Send a message to everyone in their rooms, -OR- 3. close all of the breakout rooms. |
| Asking for Help |
|---|
|
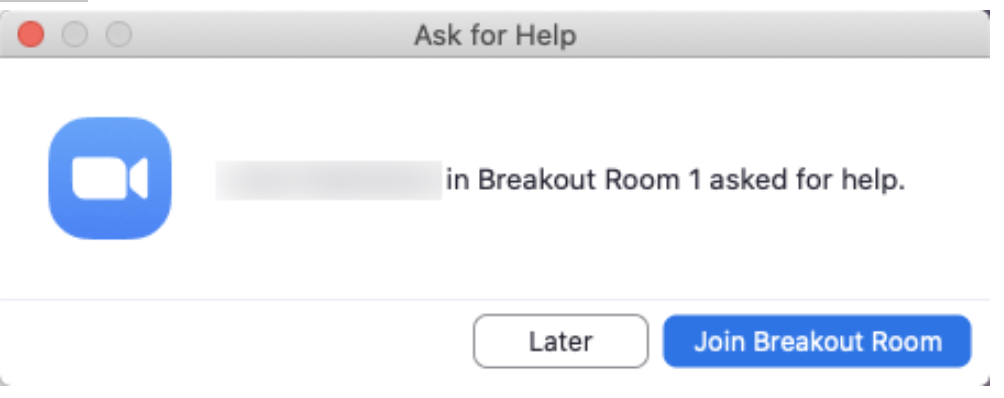
Participants in the breakout rooms will also see a “Ask for Help” button that will allow them to request that the host of the Zoom meeting join their room. |
Sharing Screen
You can share your screen to everyone in the Zoom meeting. This is helpful if you wish to display a PowerPoint presentation, a meeting agenda, or any other screen or program you’d like the attendees to see.
Click to learn more about how to Share Your Screen.
| Turn On Screen Sharing |
|---|
|
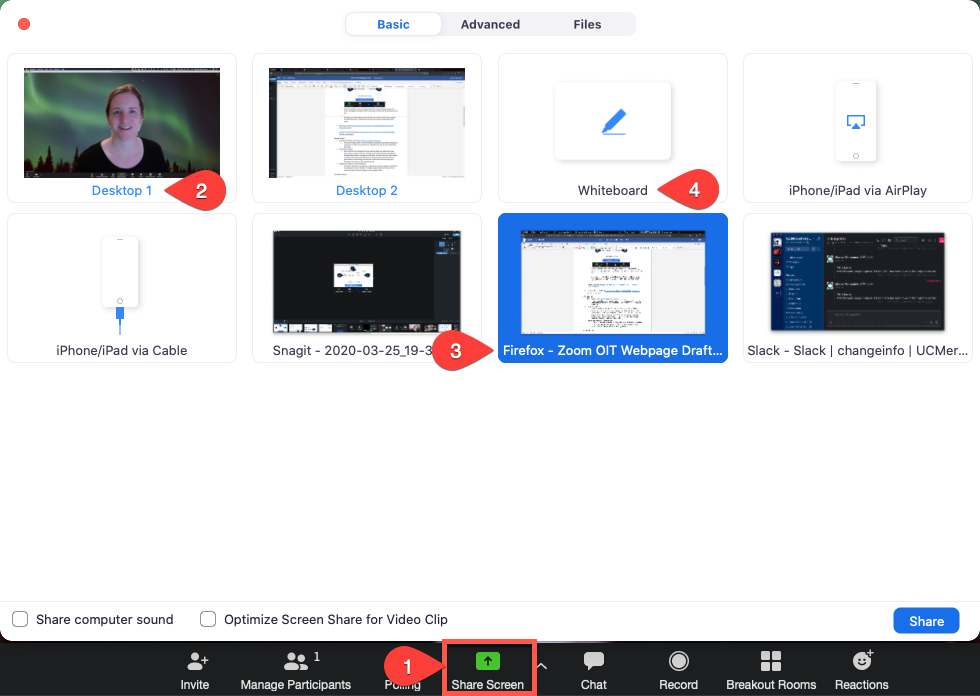
1. In your Zoom meeting, click on “Share Screen,” then chose what you want to share. The choice you make will determine what attendees see. You can: 2. Share your entire desktop. -OR- 3. Share a particular program. -OR- 4. Share a virtual whiteboard. |
Virtual Whiteboards
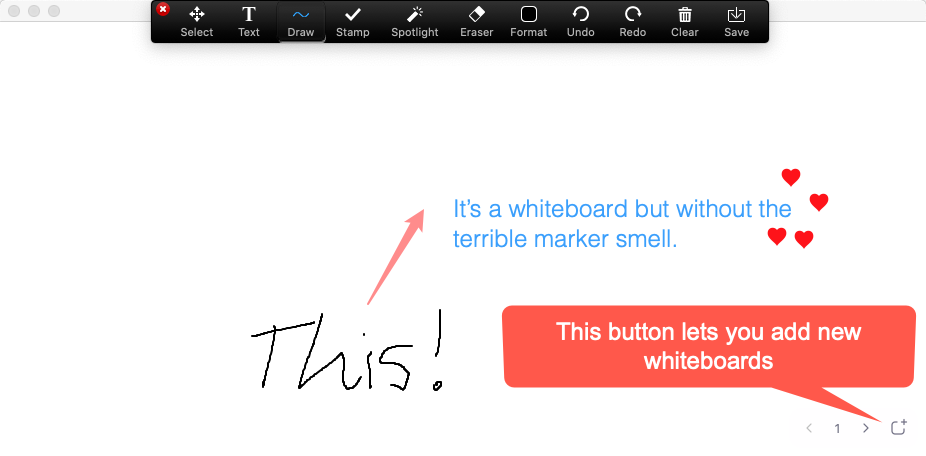
One of the options in the Share Screen feature (above) is the ability to share a virtual whiteboard. Using this creates a blank window in which you can type text, draw, and add stamps. Be aware that your participants can also draw on the whiteboard, but this can be managed by the host!
Click to learn more about Sharing Virtual Whiteboards.
| Turn on Virtual Whiteboard |
|---|
|
|

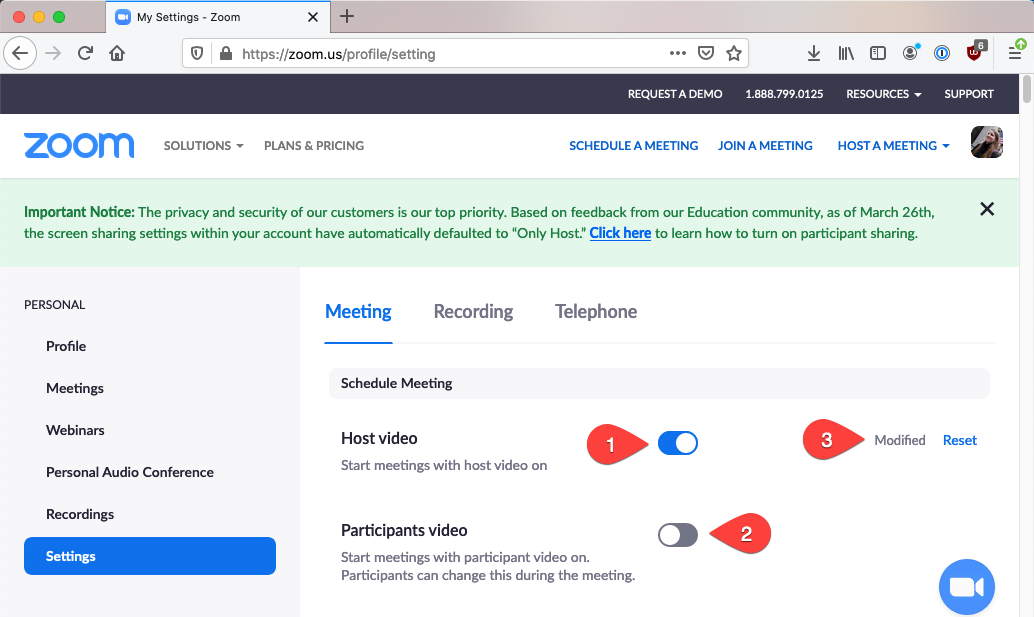
Downloading the Client
The Zoom desktop client is the best method for hosting and joining Zoom meetings as it offers the most features and customizable settings. Mobile Zoom apps are also available for download.
Click here to Download the Zoom Client.
Zoom provides regular updates to its platform. If you are having trouble updating the client, click here to download the latest version of Zoom. To see instructions on how to update your client, click on Update Your Zoom Version below.
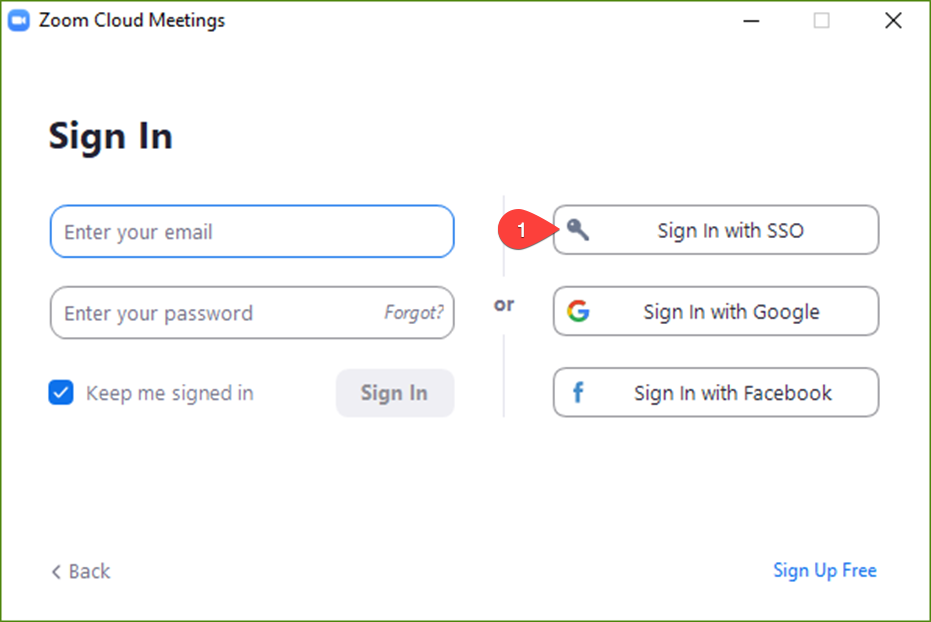
Signing Into Zoom (SSO)
| Signing Into Zoom with UC Merced SSO |
|---|
|
1. Click on "Sign in with SSO." 2. Type "ucmerced" into the "Company Domain" text box 3. Click "Continue." |

Update your Zoom Version
Ensure you have updated Zoom to the latest version: 5.0. This can be done via "Check for Updates" on the Zoom Client (see above). All users will need to upgrade to version 5.0 by May 30 to continue using Zoom.
| Check for Updates |
|---|
|
1. Go to the Zoom menu 2. Click "Check for Updates." |

| Update Zoom |
|---|
|
1. Click "Update" |

Testing Audio & Video
Zoom offers a test meeting that can be used to adjust your audio and general readiness to participate in Zoom meetings. The on-screen prompts will walk you through testing audio, microphones, and video in this test meeting. This will ensure that you can be seen and heard. The test meeting can be used anytime and is a great feature for those new to Zoom. Send the link to anyone new to Zoom who may be joining your meeting so that they can be prepared ahead of time.
Click to access the Test Meeting.
Headset/Webcam Recommendations
- Headset: Jabra Evolve 40
- Webcam: Logitech C925E Business Webcam

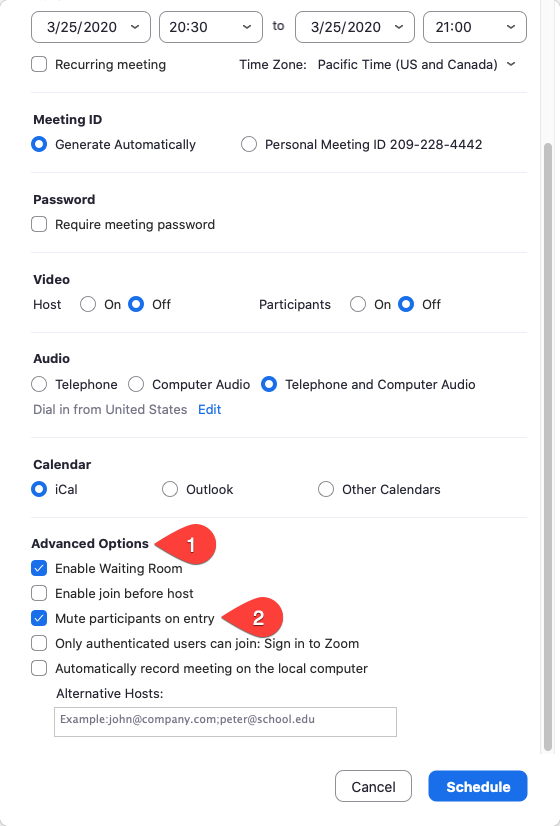
Muting participants on entry
Ensure a smooth start to your meeting by setting up your meeting to mute everyone as they join. This will prevent unwanted noise as everyone gets settled. As you start the meeting, just let all attendees know that they will need to unmute themselves to speak.
| Setting Up 'Mute Participants On Entry' |
|---|
|
1. When you are scheduling your meeting, click “Advanced Options.” 2. Check “Mute participants on entry.” |
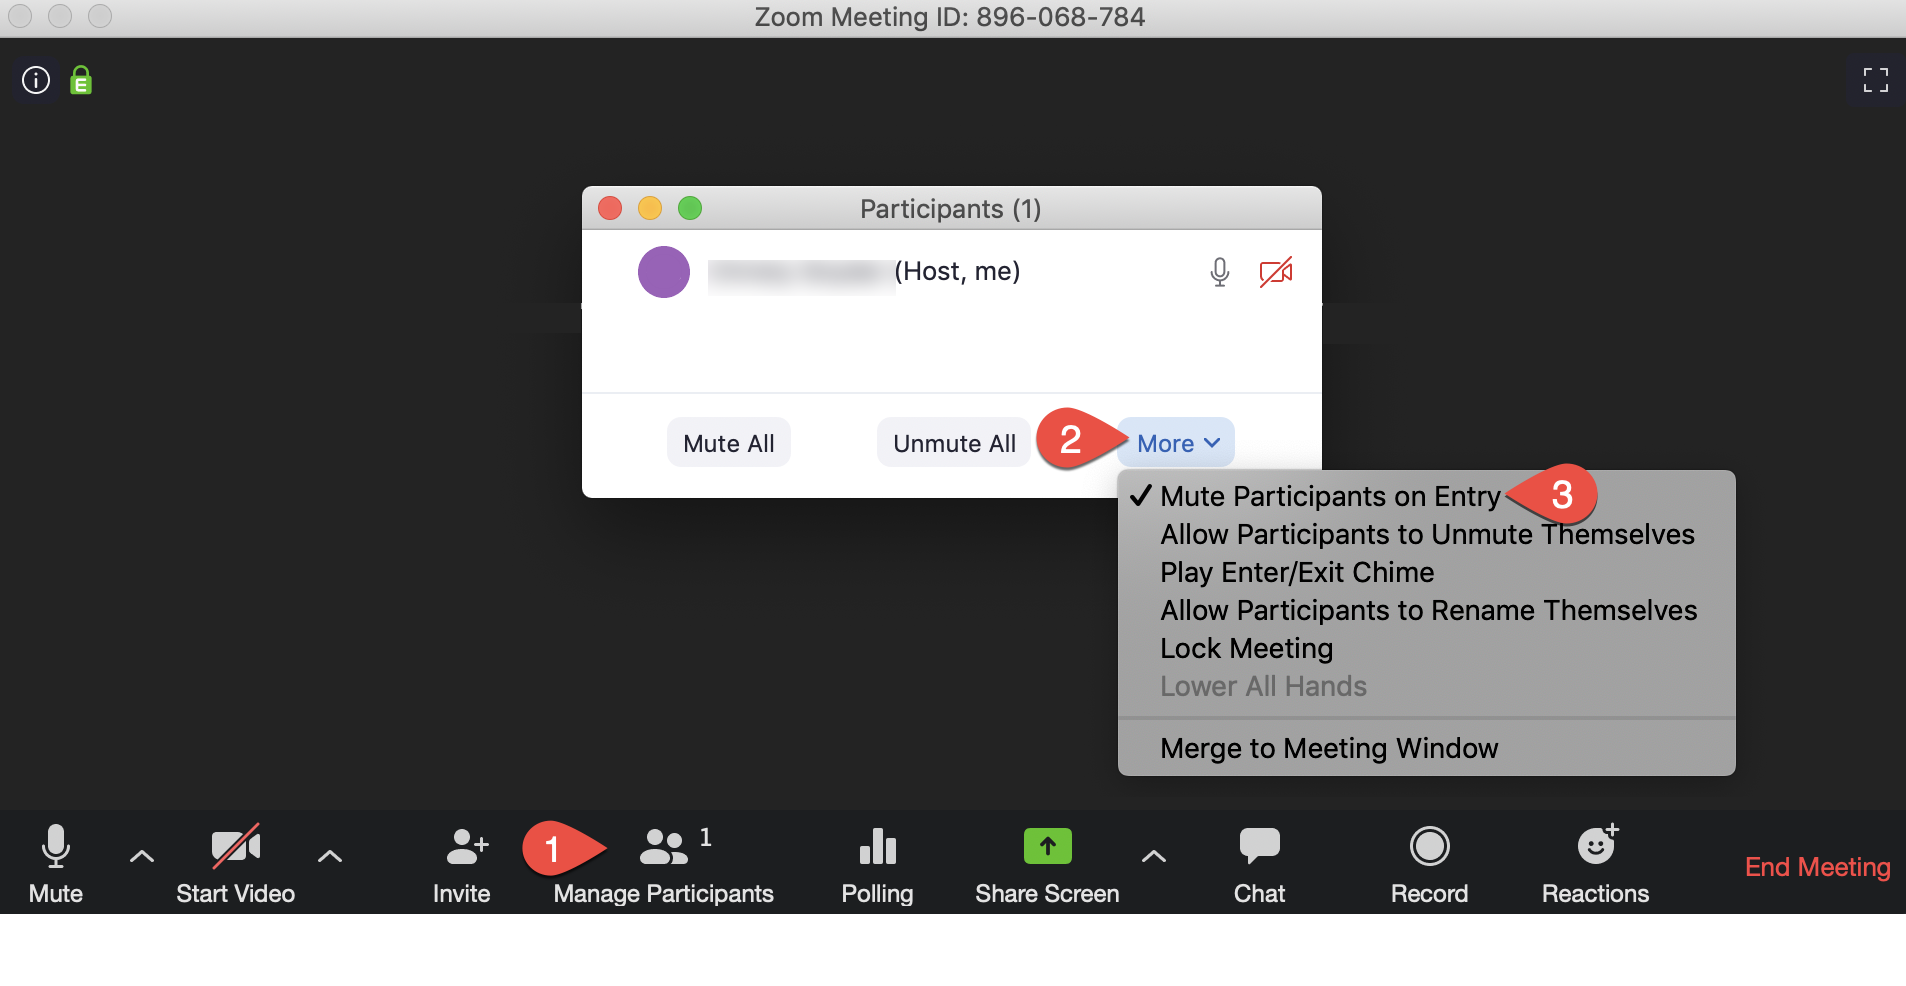
| Muting Participants During the Meeting |
|---|
|
If you have already started your meeting and need to mute participants, 1. Click “Manage Participants” in the bottom of the Zoom window. 2.Click “More” 3. Click on “Mute Participants on Entry” |
Turn on your video
Using a webcam and sharing your video to your meeting or class allows for more of an in-person feeling. Facial expressions and hand gestures are an important part of communication that we take for granted when meeting in person. Using video helps bridge the gap and bring meaning and feeling to your presence.
| Turning on Video |
|---|
|
1. Start your video during any Zoom meeting by clicking on “Start Video” on the Zoom toolbar. 2.You can also click on the “^” next to the Start Video button to choose which camera you’d like to use. |
Set a good scene
You’ll want to put yourself in an area with as little distraction as possible to make the most out of your meeting or class. If you can, find a quiet space where you can be alone. It’s also good to ensure your background is neutral – if you can find a blank wall, that’s best. If you can’t, you might consider using the Virtual Zoom backgrounds.
Click to access Virtual Zoom Backgrounds.
The UC Merced Marketing team has created several UC Merced virtual backgrounds that you can use in your Zoom meetings. Click here to browse & download your favorites.
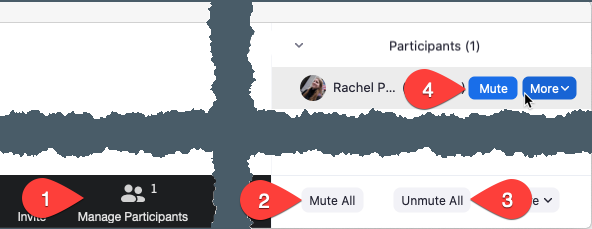
Muting and unmuting participants
Meeting hosts can mute participants when the need arises. The host can choose to mute all participants or individual mute participants as necessary.
| Turn On/Off Mute |
|---|
|
1. Click on “Manage Participants” You can: 2. “Mute All” -OR- 3.You can also “Unmute All” -OR- 4.Mute individual participants by hovering over their name. |

Staying muted until you want to talk
| Mute Yourself |
|---|
|
Typing, pets, kids, and sneezes can all make for a distracting meeting experience. It’s best to mute your microphone until you need to talk and leave unmuted only until you’re finished talking. 1. You can mute your microphone by clicking on the “Mute” icon in the Zoom toolbar. 2. Click the "Unmute" button that appears when you are muted to talk again. |

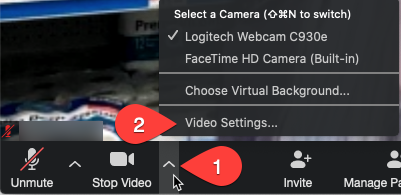
Turn on your video
| Video Settings |
|---|
|
Using a webcam and sharing your video allows for more of an in-person feeling. Facial expressions and hand gestures are important part of communication that we take for granted when meeting in person. Using video helps bridge the gap and bring meaning and feeling to your presence. 1. Start your video during any Zoom meeting but clicking on “Start Video” on the Zoom toolbar. 2. You can also click on the “^” next to the Start Video button to choose which camera you’d like to use. |
Set a good scene
You’ll want to put yourself in an area with as little distraction as possible to make the most out of your meeting or class. If you can, find a quiet space where you can be alone. It’s also good to ensure your background is neutral – if you can find a blank wall, that’s best. If you can’t, you might consider using the Virtual Zoom backgrounds.
Click to access the Virtual Zoom backgrounds.
The UC Merced Marketing team has created a number of UC Merced virtual backgrounds that you can use in your Zoom meetings. Click here to browse & download your favorites.

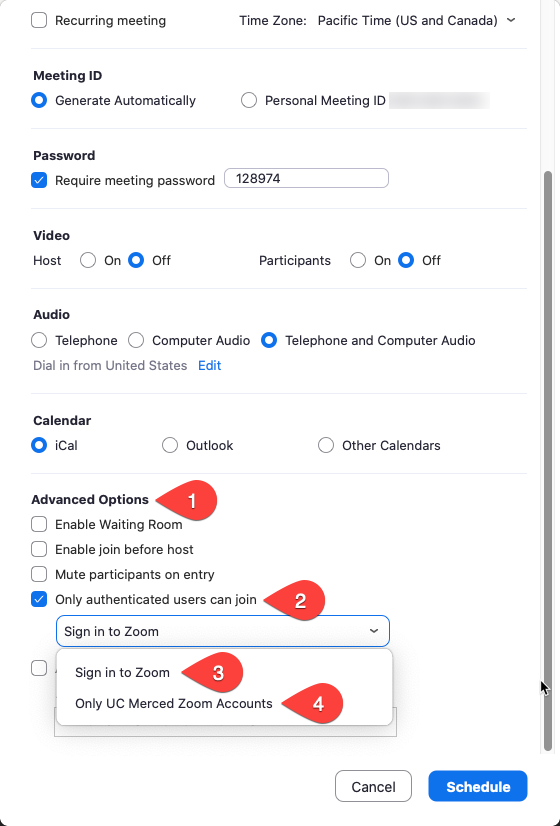
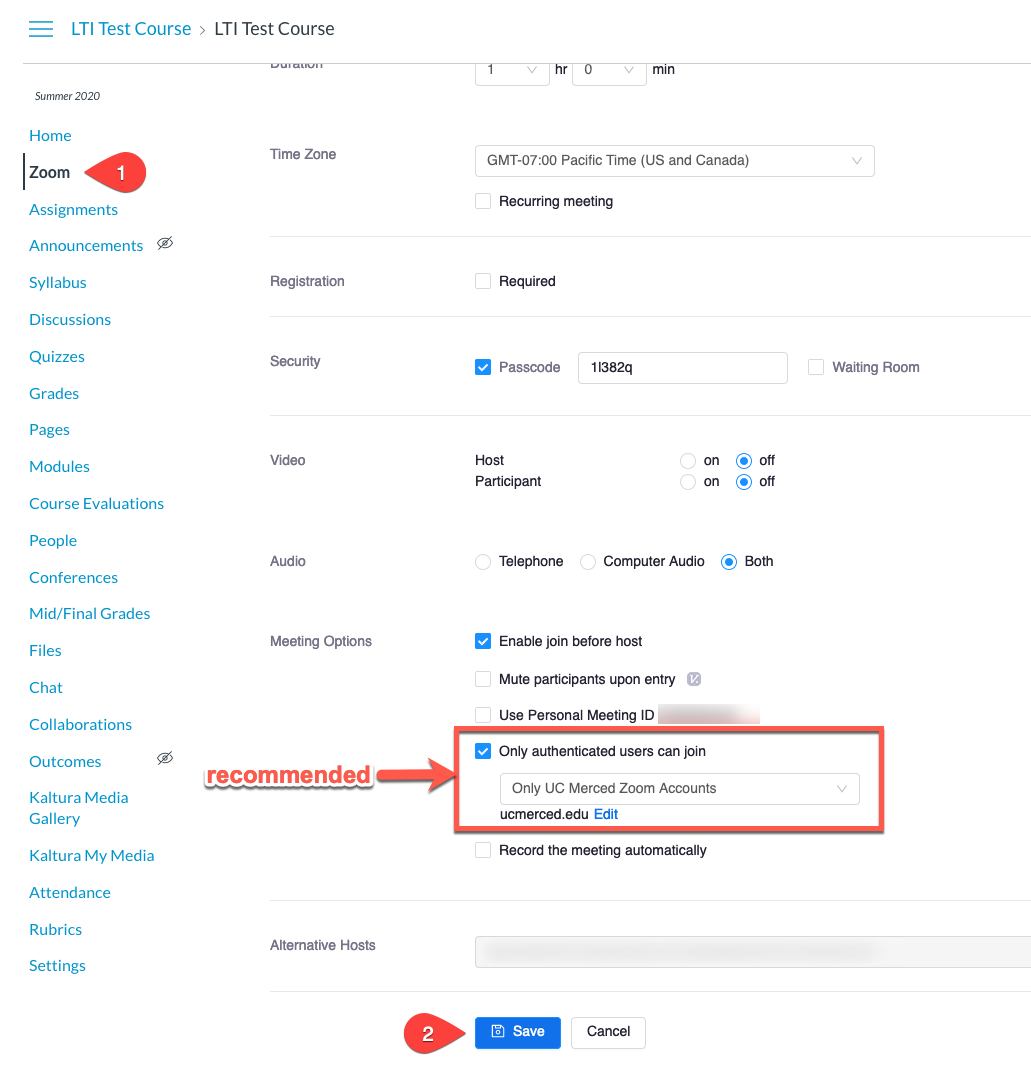
Authentication and requiring participants to have a Zoom account to join (optional: UC Merced access only)
This option requires participants to have a Zoom account to join your Zoom call. This can help keep unwanted people out of the call and ensure you can see all participant names when they join. Allow only authenticated users is on by default.
| Setting Authentication when Scheduling a Meeting |
|---|
|
1. When you are scheduling your meeting, you can find this setting under “Advanced Options” 2. To turn off the default (requires anyone joining the meeting to have a Zoom account), uncheck “Only authenticated users can join" 3. The default setting is "Sign in to Zoom" which will require anyone trying to join the meeting to have a Zoom account. Participants can join from any Zoom account belonging to any company or institution, or a fee Zoom account. 4. To allow ONLY those with a UC Merced email address to join, make sure the “Only authenticated users can join: Sign in to Zoom” is checked AND select "Only UC Merced Zoom Accounts" from the drop down. |
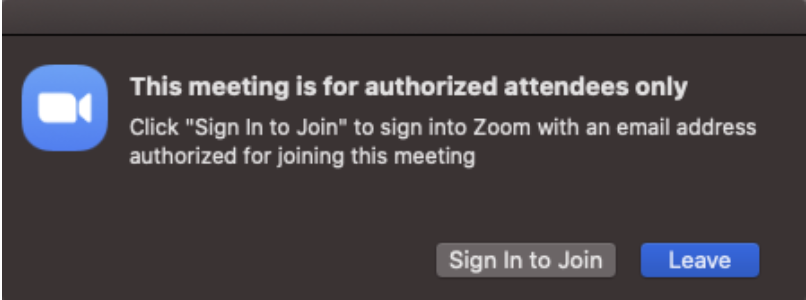
| Entering an Authenticated Meeting |
|---|
|
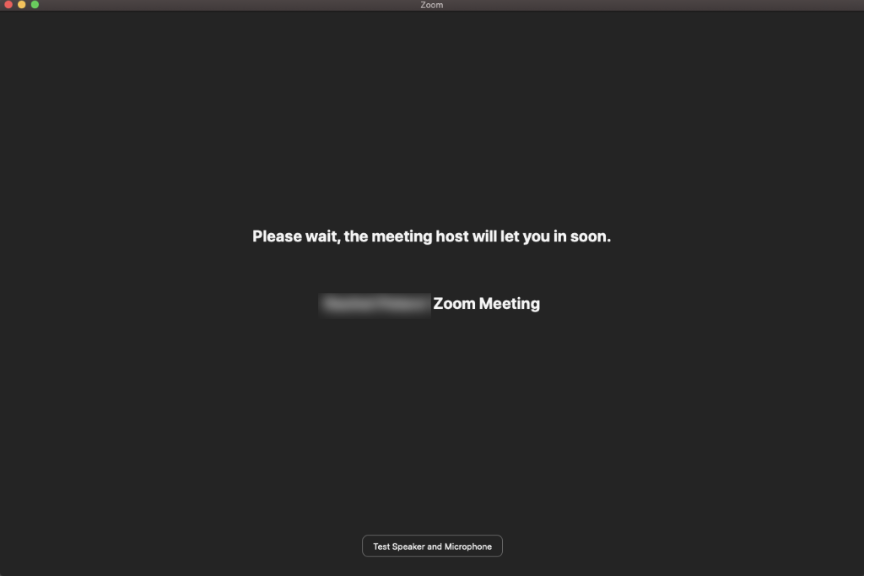
Anyone who joins the call will see the following message if they are not signed in to a Zoom account. |
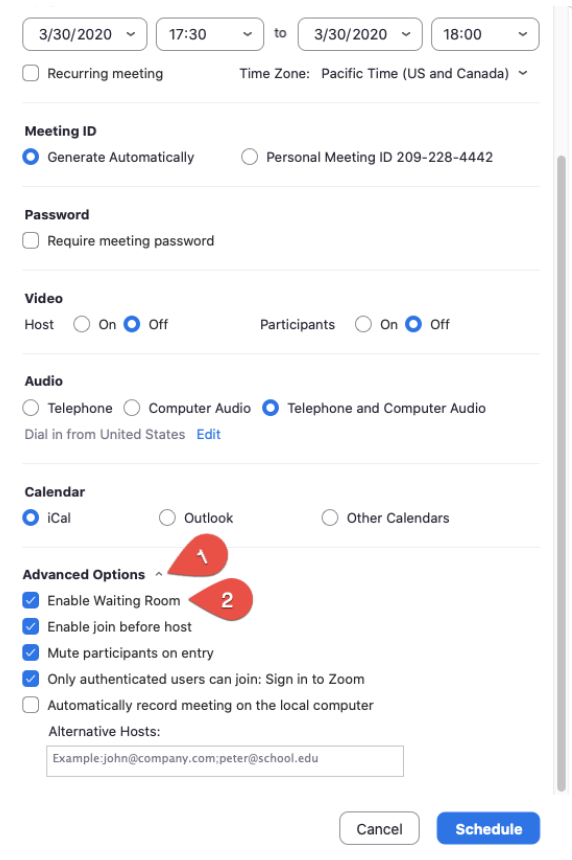
Enabling a waiting room
Alert: Starting Sunday, September 27, Zoom will automatically enable waiting rooms for meetings that have not already enabled either a waiting room or passcode. See Zoom Default Settings Changes under Current Alerts above for more information.
A waiting room is an area where people joining your call stay until you move them into your actual Zoom meeting. This can be used to make sure that only those you wish to join your call can enter. Learn more about how to utilize this feature by clicking Enabling a waiting room.
| Setting Waiting Room when Scheduling a Meeting |
|---|
|
1. When you are scheduling your meeting, you can find this setting under “Advanced Options” 2. Check “Enable Waiting Room” |
| Entering a Meeting from a Waiting Room |
|---|
|
Anyone who joins the call will see the following message. |
Adding participants from a waiting room
Click to learn more about adding participants to a waiting room.
| Admitting Participants from the Pop Up |
|---|
|
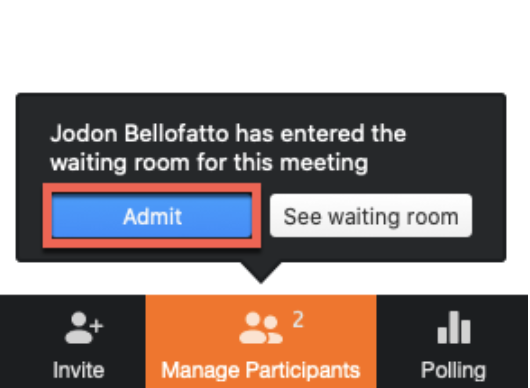
When someone joins a meeting that has a waiting room, the host of the meeting will get a pop up and can chose to Admit the participant.
|
| Adding Participants from the Side Bar |
|---|
|
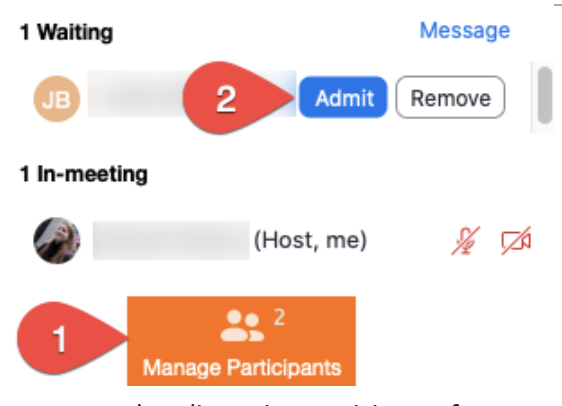
If you miss the pop-up or want to see who’s in the waiting room: 1. Click on "Manage Participants" 2. Click Admit next to the name of the person you want to admit. |
Removing unwanted or disruptive participants from meeting/class
Click to learn more about removing unwanted or disruptive participants from a meeting/class.
| Removing Someone from an In Progress Meeting |
|---|
|
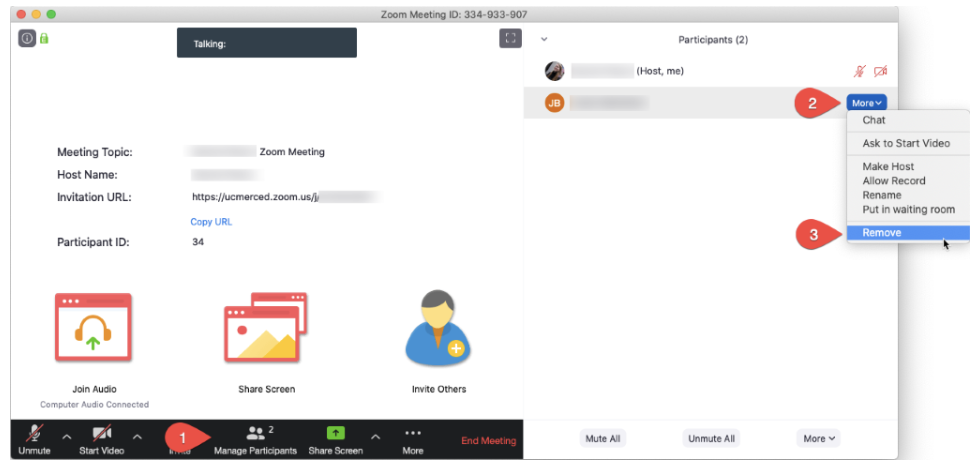
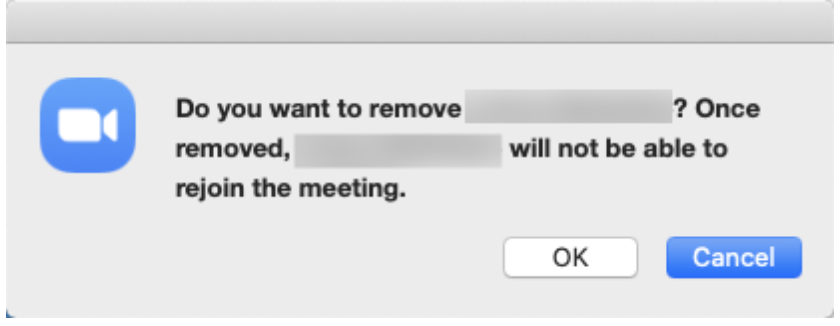
If you wish to remove someone from your in progress meeting: 1.Click “Manage Participants” 2. Hover over the name to click on the “More” button. 3.Click on “Remove” |
| Confirm Removing Participant |
|---|
|
You will be prompted to confirm that you want to remove the participant.
|
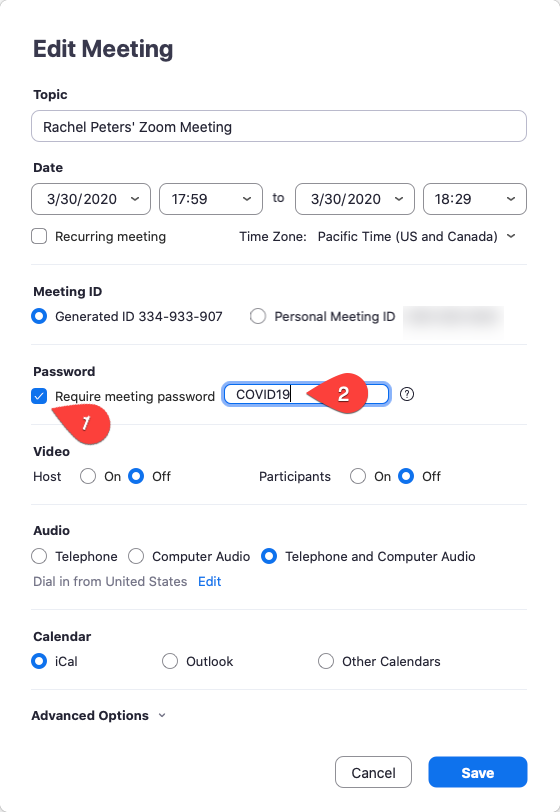
Setting and Modifying the password to join meeting/class
By default, all scheduled meetings require a password that people joining the Zoom meeting must have in order to join. A password is randomly assigned, but can be changed. Passwords can contain letters and numbers, but if the password has letters, Zoom will provide a numeric password for those dialing in by phone. Click to learn more about requiring a password to join a meeting/class.
| Setting Password when Scheduling a Meeting |
|---|
|
1. A password will be required if “Require meeting password” is checked. 2. You can use the password automatically generated or set your own by typing it in the space provided. |

Virtual Backgrounds
If you have a messy room or want to have a bit of fun, Zoom lets you choose a virtual background to be displayed behind you while you’re using your webcam. Click to learn more about Virtual Backgrounds.
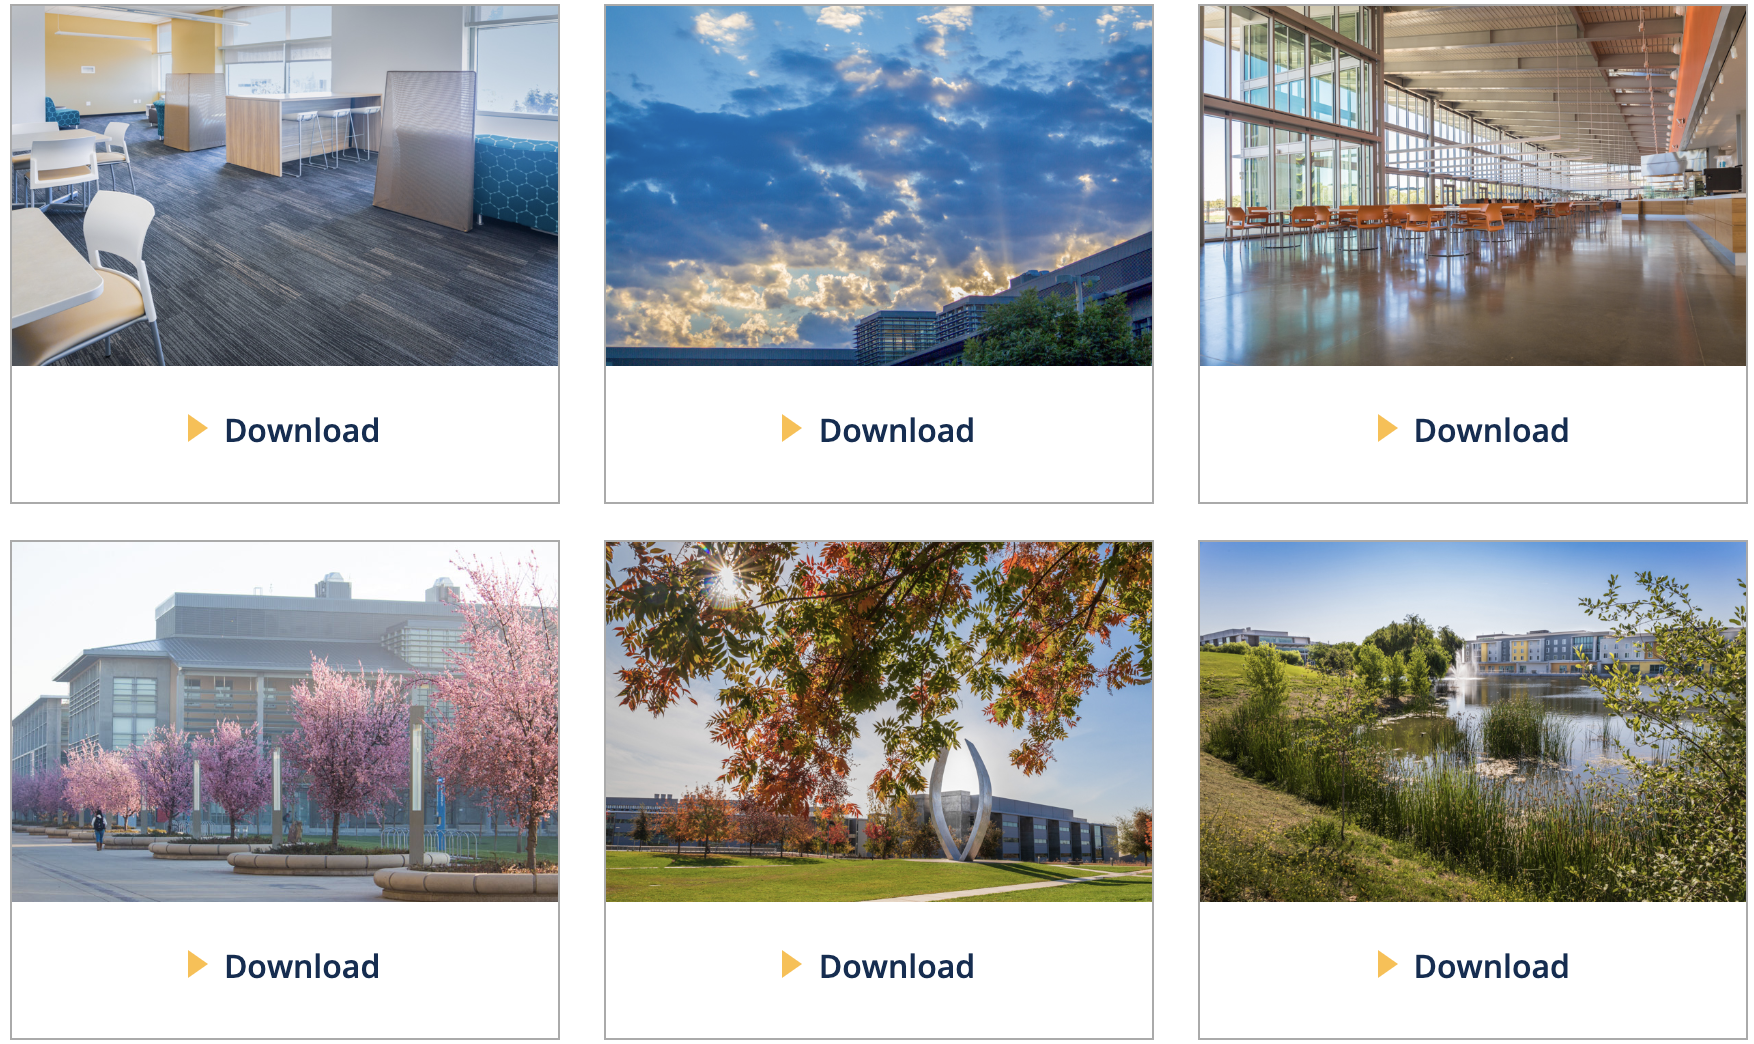
The UC Merced Marketing team has created several UC Merced virtual backgrounds that you can use in your Zoom meetings. Click here to browse & download your favorites.
| Setting up Virtual Background |
|---|
|
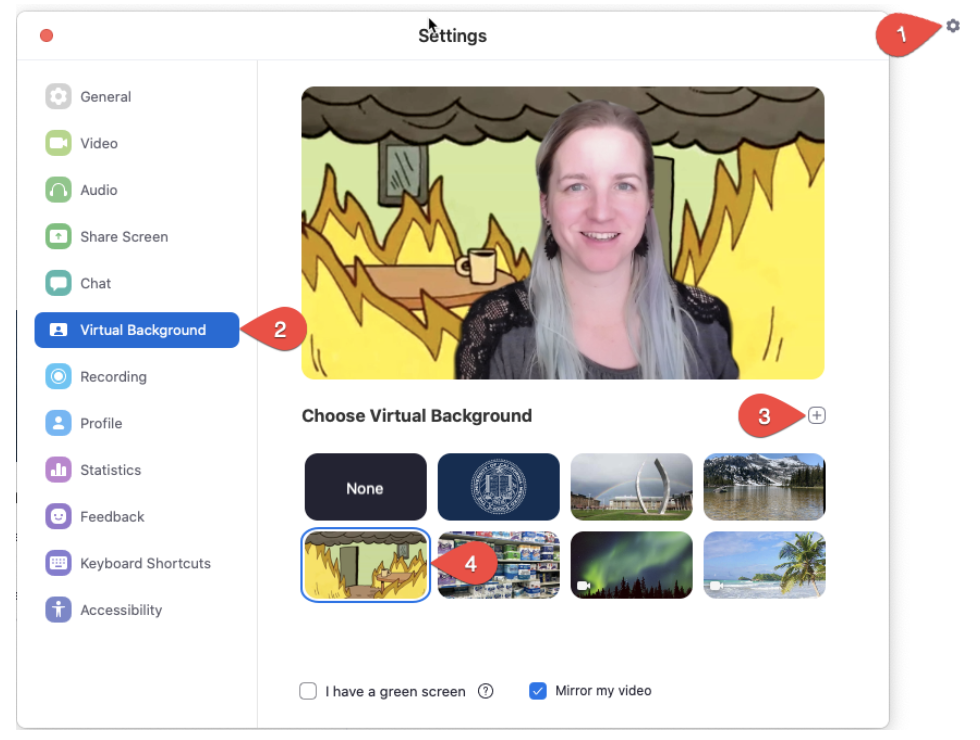
1. When you have the Zoom app open, click on the gear icon. 2. In the upper right-hand corner to open you options. Click on “Virtual Background” 3. Then you can add your own photo by clicking on the “+” - OR - 4. Chose from one of the provided photos or previous photos you have added. 5. Once you set a virtual background, it will appear for all of your meetings. You can disable it again by following the above instructions and clicking on “None” if you’re not in a meeting. |
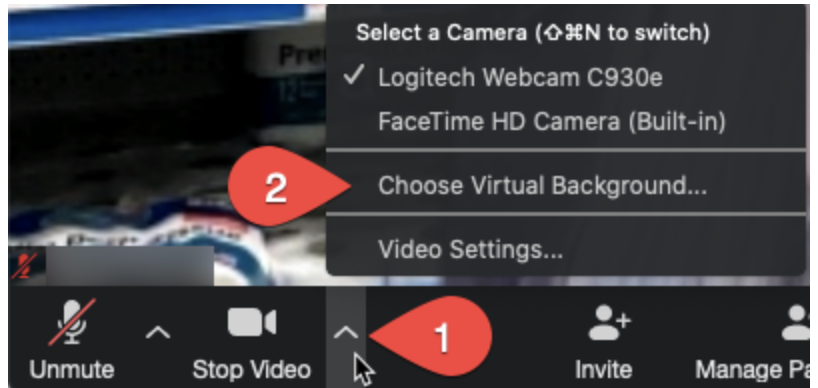
| Turning Off or Changing Virtual Background |
|---|
|
1.If you wish to turn your virtual background off or change it for a particular meeting, click on the “^” next to “Start/Stop Video” 2. Click on “Choose Virtual Background” to be taken to the screen above. |
Zoom Accessibility
Visit this website for information on making Zoom accessible for meeting participants.
Zoom Polling
Learn more about Zoom Polling here.
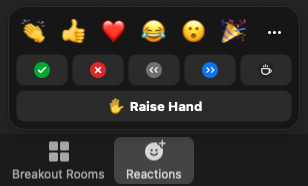
Non-verbal feedback & Reactions
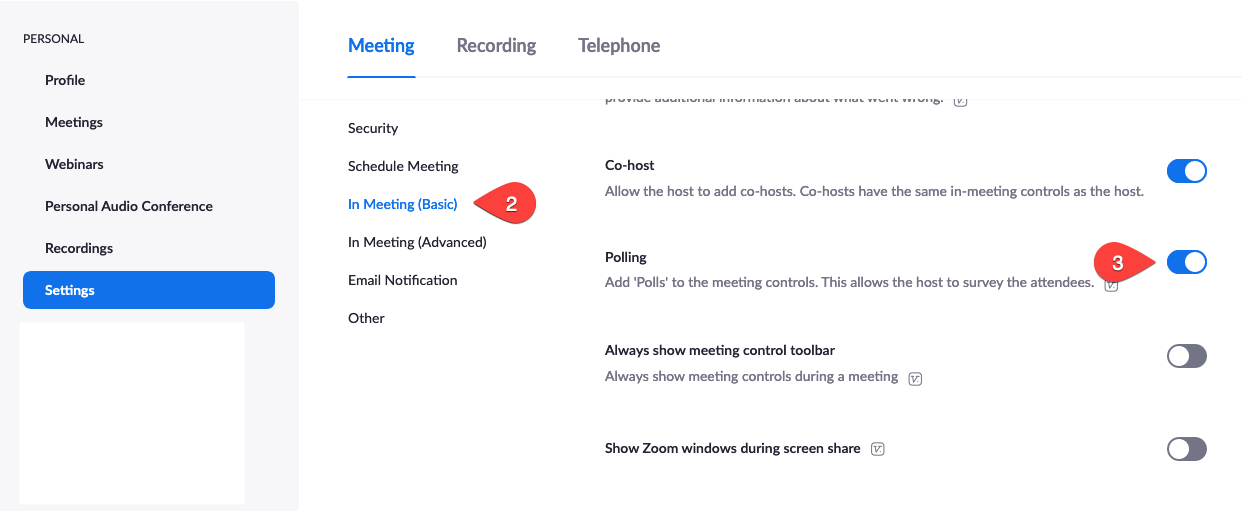
Non-verbal feedback is an option a meeting host can turn on that allows participants in the meeting to be able to give a number of feedback options such as yes, no, slow down, speed up). Reactions are an additional feedback method that allows participants to use emojis. These are particularly helpful in large meetings and classes, as they allow the host or co-hosts to monitor the non-verbal feedback to manage questions or the presentation at hand.
| Enabling Non-verbal Feedback & Reactions |
|---|
|
Start by heading to your Zoom settings in the web interface: https://ucmerced.zoom.us/profile/setting 1. Click on "In Meeting (Basic)". 2. Scroll down a little bit to find the "Nonverbal feedback" line and click the toggle so it is on. 3. Toggle on "Meeting Reactions". |

| Feedback & Reactions Participants Can Use |
|---|
|
Anyone who joins the Zoom meeting can open up the Reactions panel to see the options above and click on them to provide feedback during the meeting. |
Automatic Zoom Meeting Feature for Outlook and o356
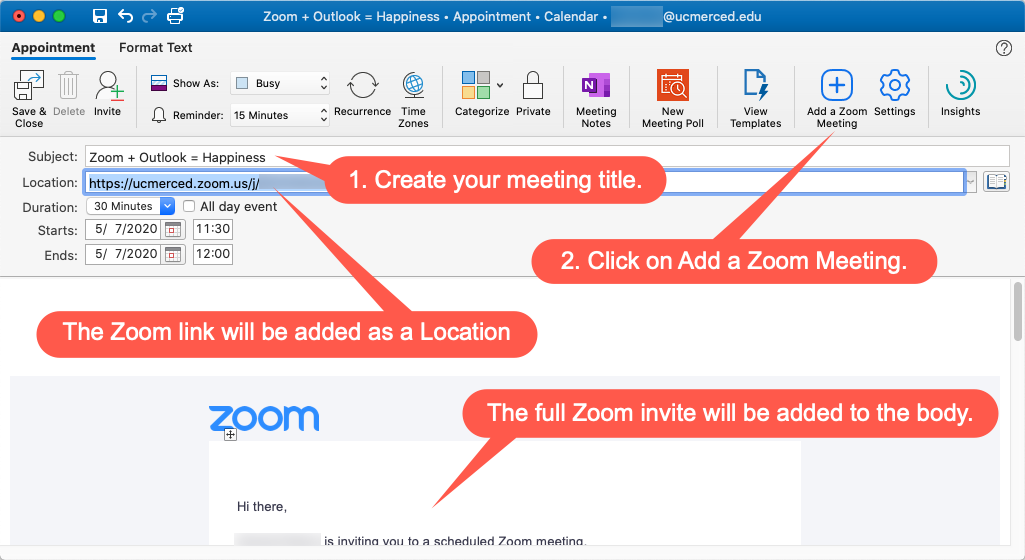
OIT has configured our UC Merced email so that a new Zoom integration for Outlook will automatically be available to all UC Merced users in o365 webmail, Outlook for Mac, and Outlook for PC. This integration allows you to generate Zoom links and invites within the add appointment window for Outlook and o365 webmail.
If you can’t see the Add Zoom Meeting button, it may be hidden under the “…” in the menu, which signifies there are more items. You will be prompted to sign into your Zoom account the first time you use this feature.
Tips:
• Add your meeting title before pressing the Add Zoom Meeting button or you won’t see your meeting title in your Zoom meeting schedules.
• If you cancel or delete the meeting in Outlook, the meeting will still show up in your Zoom meetings list.
• If you delete the meeting in Zoom, the Outlook event will continue to exist, but the Zoom link will not work.
| Using Meeting Feature |
|---|
|
|
Delegate Access
If you need to schedule Zoom meetings on someone else's behalf, or you need someone else to be able to schedule Zoom meetings on your behalf, Zoom and Outlook together offer features to meet such needs. First, follow the steps below to Grant Delegate Access in Outlook, then follow the steps to Assign Delegate Access in Zoom.
| Grant Delegate Access in Outlook |
|---|
|
In order to allow another person to schedule on your behalf, you must first establish Delegate Access within Outlook to give them permission to schedule on your Calendar and send Zoom invitations via email. |
| Assign Delegate Access in Zoom |
|---|
|
1.Log into your Zoom profile at: https://ucmerced.zoom.us/profile 2. Click on Settings and scroll down until you see "Schedule Privilege." 3. Add the e-mail address of the person you wish to be your delegate. 4. Click "Assign." |

| Adding an Appointment on the Delegator's Calendar |
|---|
|
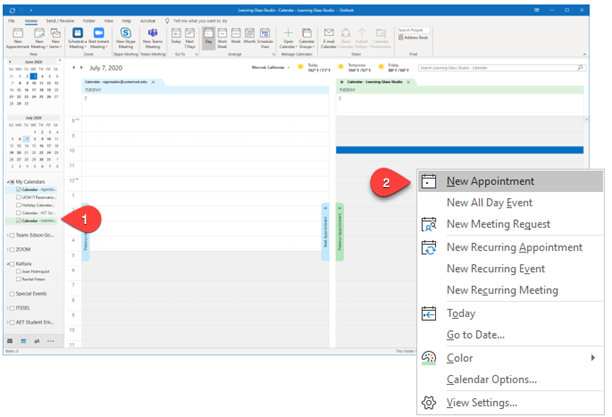
Delegates should follow these steps in order to schedule a Zoom meeting on the delegator's behalf. If the delegate cannot see the delegator's calendar, please see the above for setting up delegate access in Outlook. You may need to restart Outlook after delegate access is established to see the delegator's calendar. 1. In Outlook, click on the checkbox next to the name of the delegator under "My Calendars." 2. Right-click on the delegator's calendar, which should show up on the right side of your own calendar, and click "New Appointment."
1. Enter your meeting title. 2. Click on "Add a Zoom Meeting." |

Enabling Automatic Zoom Recording Upload to Kaltura for Instructional Video in CatCourses
For instructors who are using Zoom to record lectures or other content and want to provide those recordings in your CatCourses site, you can set up your Zoom recordings to be automatically uploaded into Kaltura at the end of your recording session. Instructors can then choose to publish those recordings to be visible to their students within CatCourses. The three steps below outline how to set this up:
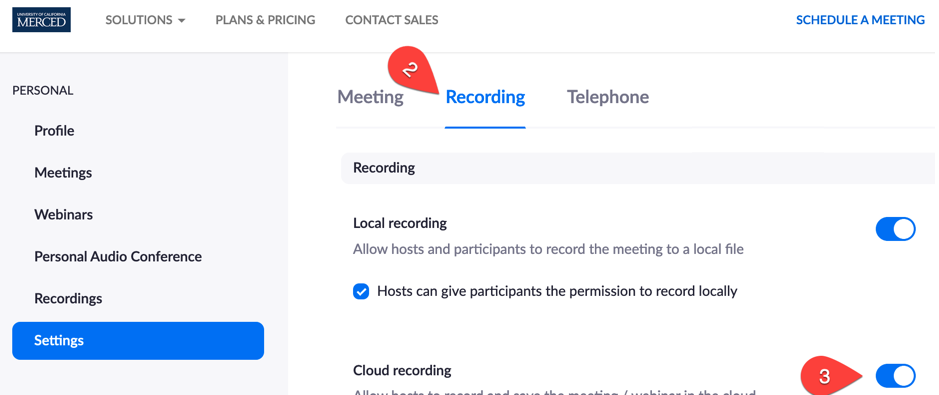
| 1. Turn on the Cloud Record Option in your Zoom Settings |
|---|
|
|
| 2. Record Your Zoom Meeting Using the Record to the Cloud Option |
|---|
|
|

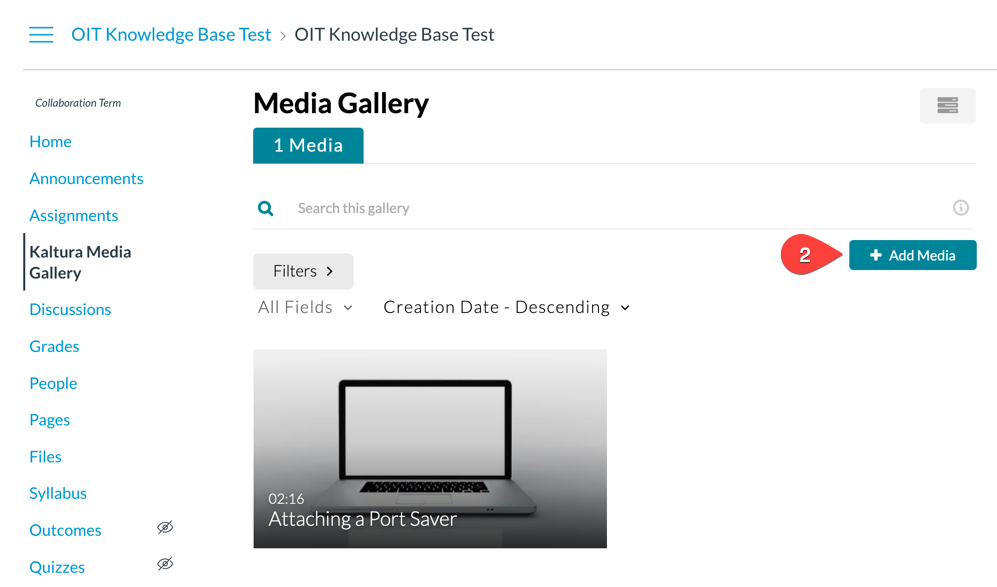
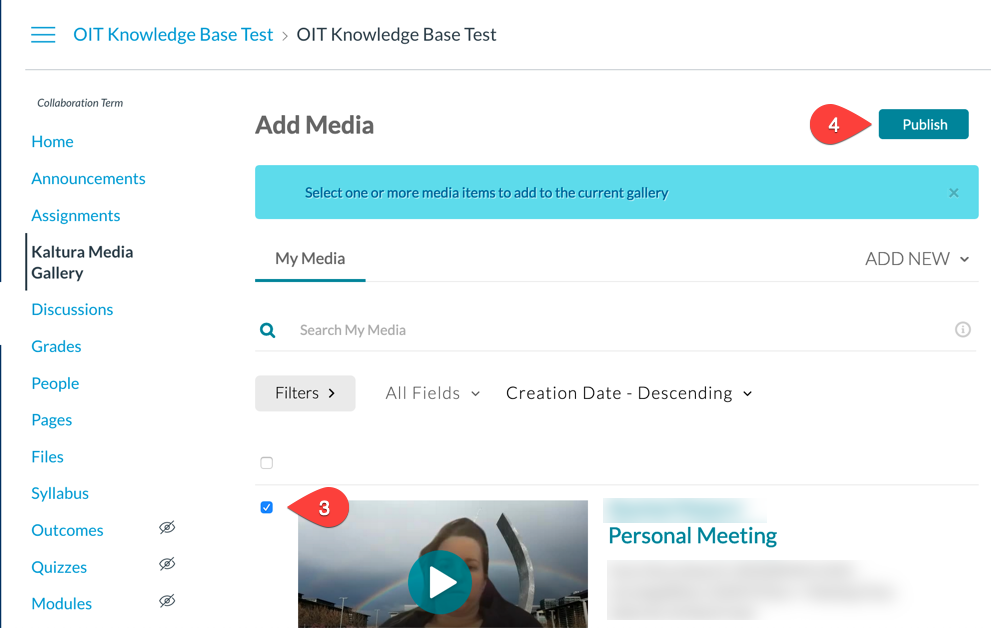
| 3. Publish your video in Kaltura Media Gallery to share with your class. |
|---|
2. In the Kaltura Media Gallery, click + Add Media.
3. Check the box next your Zoom recording(s). 4. Click Publish. The video is now available for students to watch in the Kaltura Media Gallery navigation item. You can also embed the video in other parts of your CatCourses site, such as Pages, Discussions, and Assignments. Please see our guide: Embedding a Kaltura Video in CatCourses for a step-by-step guide. |
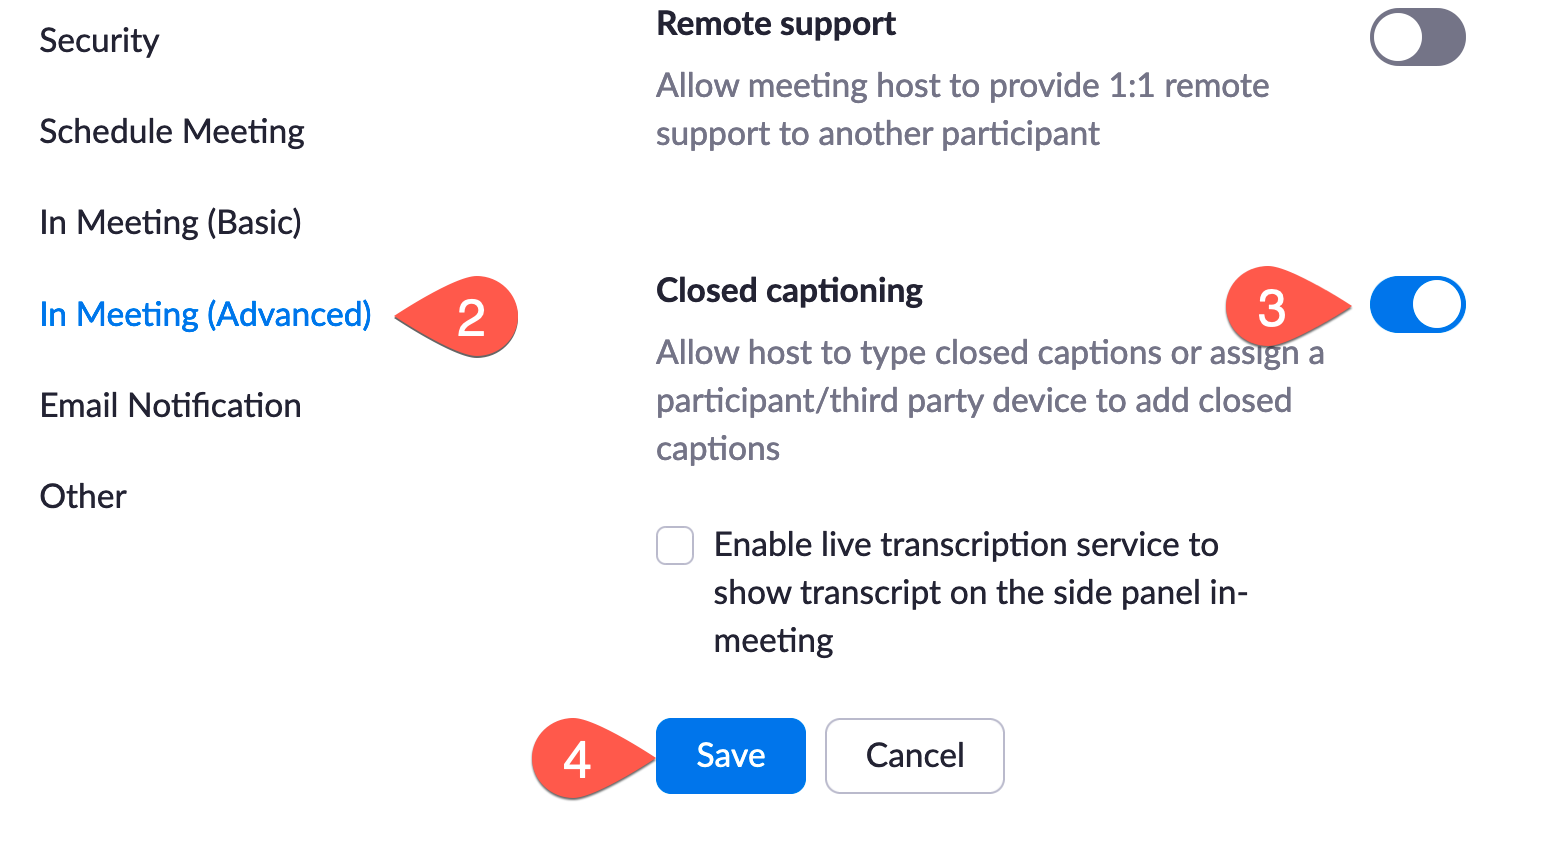
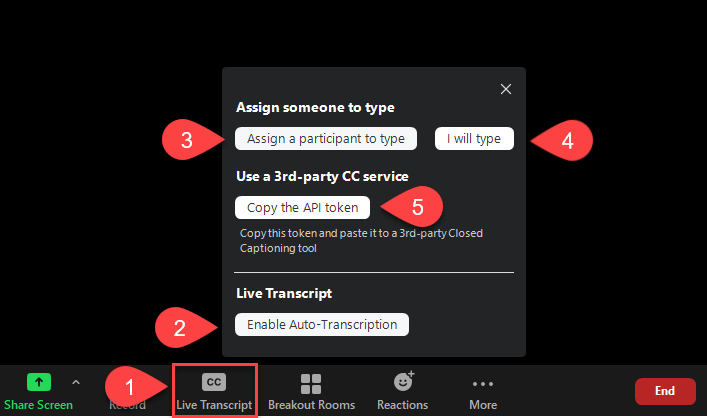
Turning on Live Captions for Meetings or Webinars
Zoom has a feature called Live Captions that uses machine-generated captioning to help create captions as people speak. Being machine-generated, these captions generally do not have a high enough accuracy to meet ADA or WCAG requirements, but they can help bridge the gap. The steps below outline how to set this up and offer additional options one can use in addition to the built-in live transcripts:
| 1. Turn on the Closed Captioning Feature in Your Zoom Account Settings |
|---|
|
|
| 2. Turn on the Live Transcription During Your Meeting |
|---|
|
|
Using Zoom Polls for Formative Assessment and Student Engagement
Zoom Polls can be a great way to conduct formative assessments and engage students in synchronous classes held over Zoom. There are three parts of using Polls in Zoom: enabling the feature for your Zoom account, creating the polls for your Zoom meeting, and accessing the responses after the meeting.
| 1. Turn on the Zoom Polls Option in your Zoom Settings |
|---|
|
|
| 2. Set up your Zoom Meeting and Create the Poll |
|---|
|
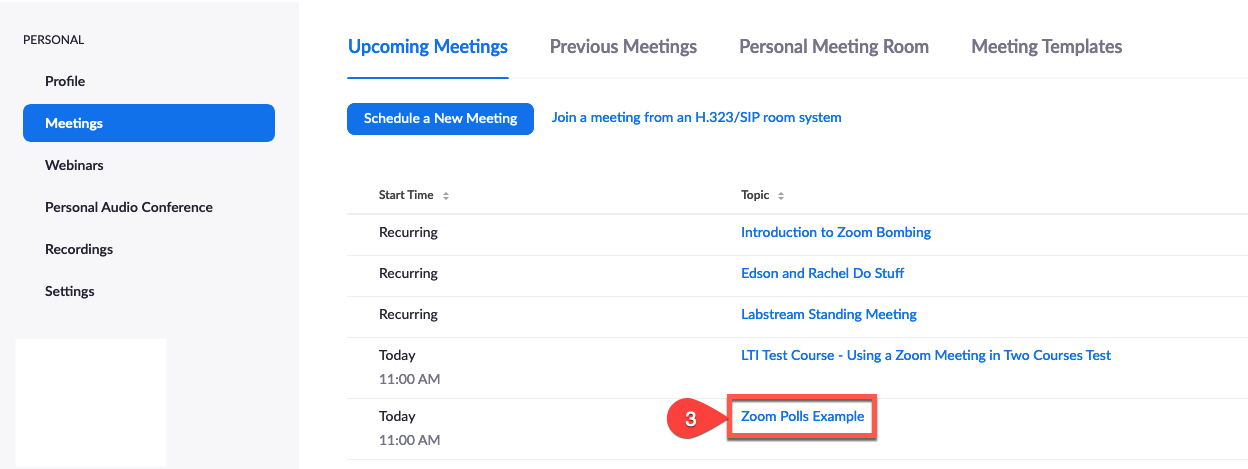
3.Go to https://ucmerced.zoom.us/meeting and click on the title of the meeting you just created.
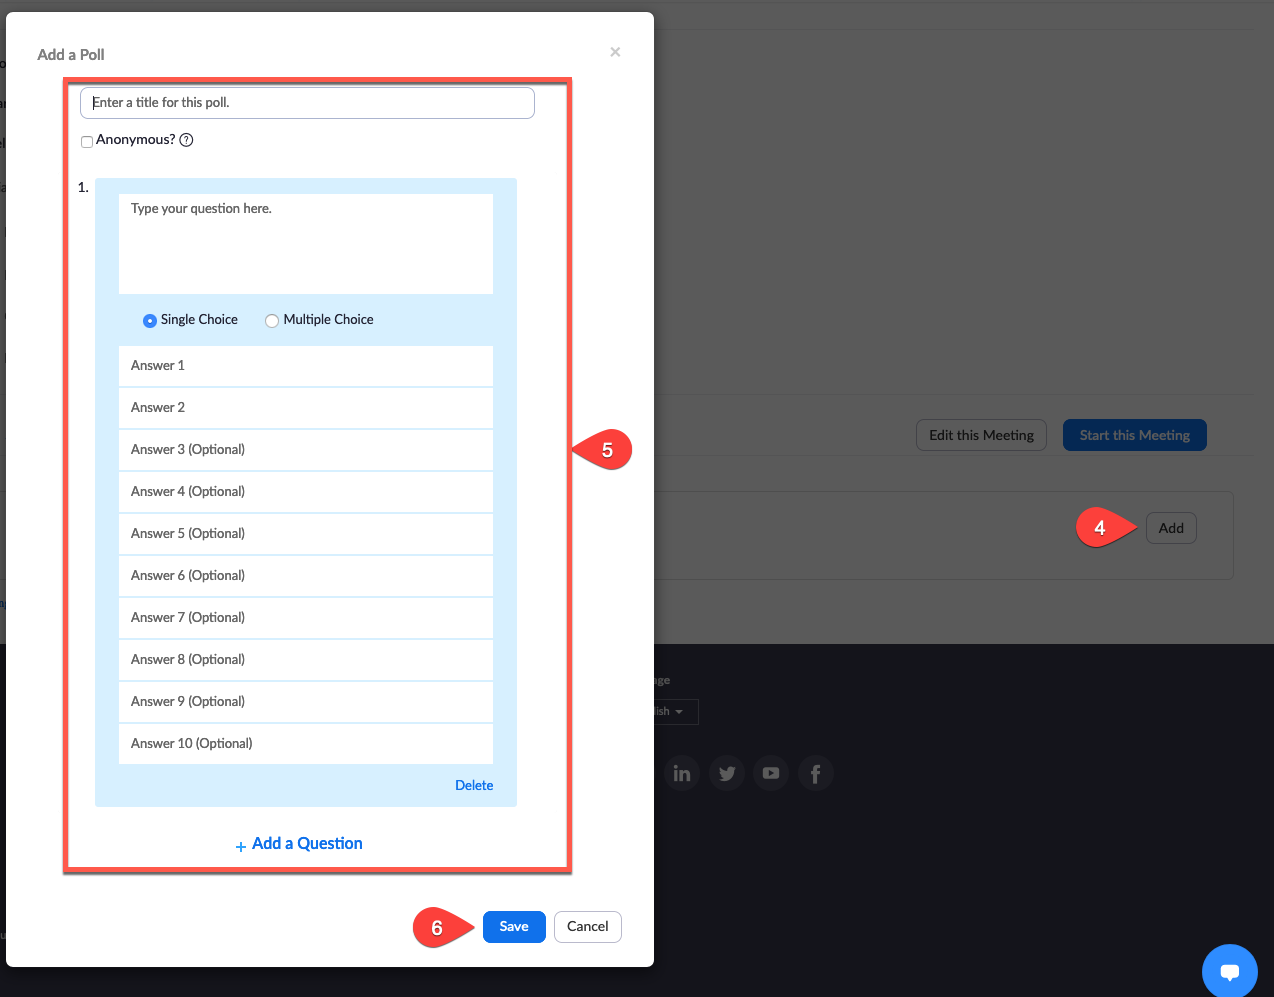
4. Scroll to the bottom o the page and click on "Add" under the "Poll" heading. 5. You can add as many questions and answers as you like and give your poll a title. 6. Click "Save". You can add additional polls if you would like. This is helpful when you want to ask questions at different times during your meeting.
When you have your Zoom meeting, a button labeled Polling will show up in the meeting bar and you will click on this to start the poll. If you made multiple polls, you will be able to choose which one you want to use. Results are saved automatically. |

| 3. Access Poll Results |
|---|
|
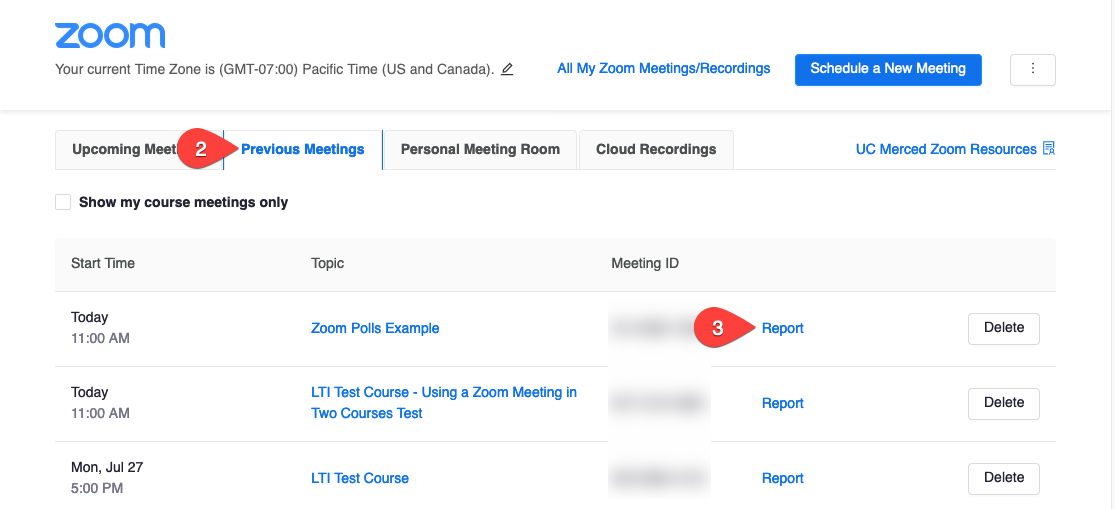
1. When the meeting is over, go back to your course in CatCourses and click on the Zoom navigation item. 2. Click on "Previous Meetings". 3. Click on "Report" next to the meeting you want to see the poll results for.
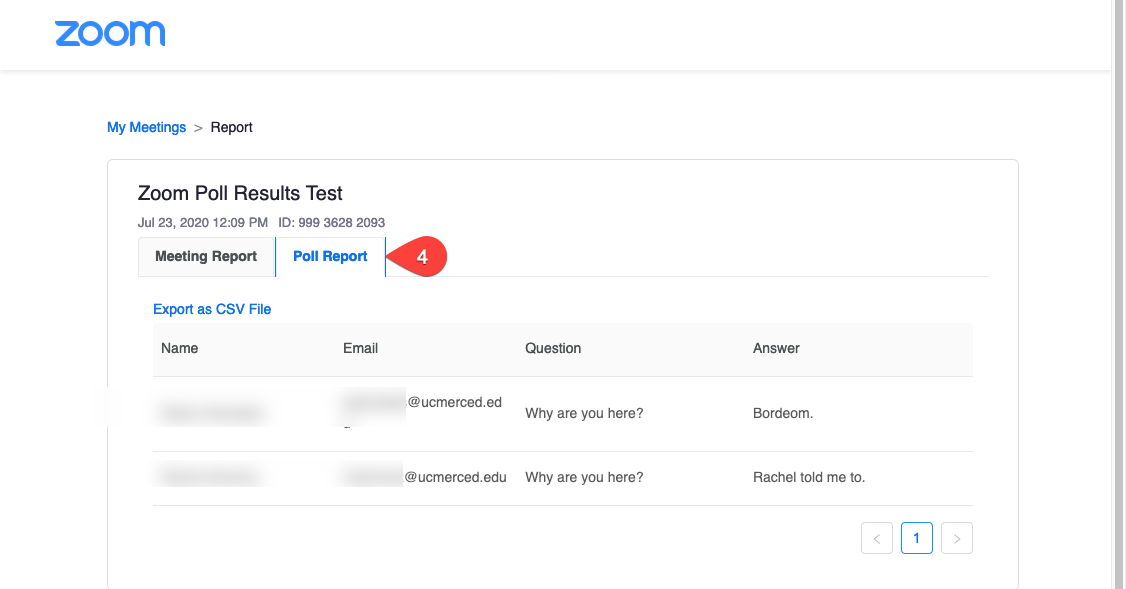
4. Click on "Poll Report". You'll be able to view the responses of the poll as well as download an excel file with responses by clicking on "Export as CSV File". |
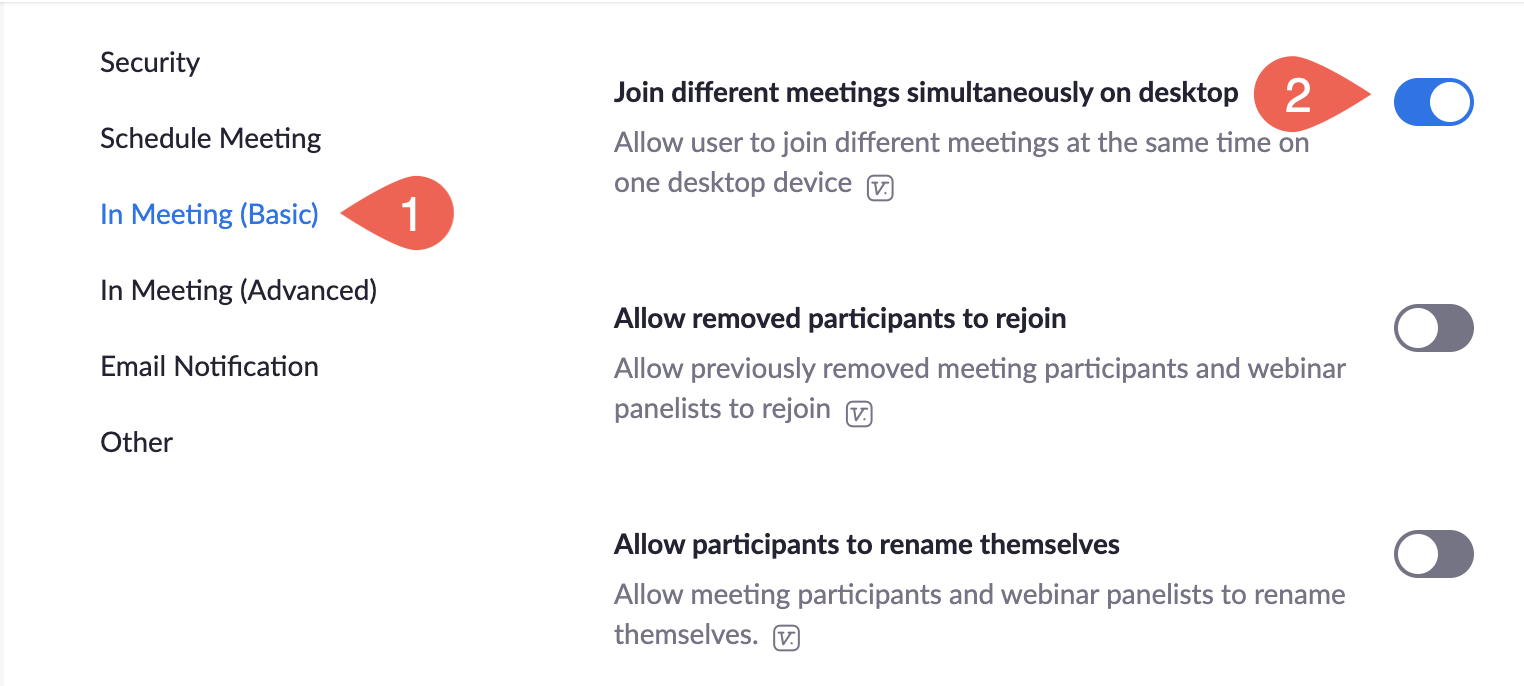
Joining Multiple Zoom Meetings
You can join multiple Zoom meetings simultaneously on your desktop. This is helpful if you wish to attend multiple Zoom meetings happening at the same time.
Click to learn more about how to Join Multiple Zoom Meetings.
| Turn On Join Multiple Meetings |
|---|
|
Note: This feature doesn't allow you to host multiple concurrent meetings at the same time. |